
|
|
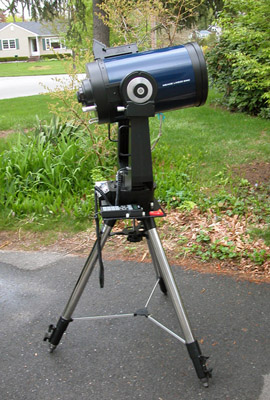
1998 It started here - my reentry into astronomy with a Meade 10" LX200, now known as the 'Classic' purchased in the summer of 1998. This telescope was amazing and a clear indication of where astronomy for the masses was moving. When I purchased my LX200 I was dedicated to visual observing only with little interest in imaging or starting into that pursuit. CCD imaging was around then, but film was the prevalent medium. I went directly into a two-inch diagonal system and it was well accessorized. This scope had excellent optics, worked well out of the box and had all the inherit difficulties users of Meade systems in that era can relate to. At this stage of the hobby I was buying all kinds of accessories from scratch - flashlights, anti-dew systems, roll-a-tables, diagonals, eyepieces, Telrads, books, etc., really gearing up. This telescope had been relegated to star party sessions and was eventually sold due to lack of use. |
|
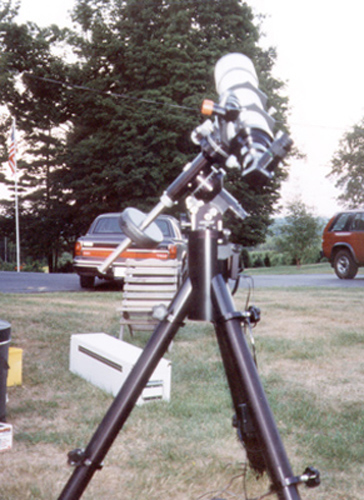
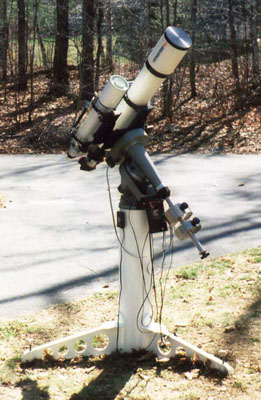
1999 At this point I'm reading everything I can about equipment, learning what's out there and get it in my head that a German Equatorial Mount (GEM) and a four-inch apo refractor would be just what I needed... A mount that could be autoguided would be really cool, after all, with a good GEM many options became available. I studied the Anacortes Telescope site often and was intrigued with the package deals offered, especially the Takahashi refractor/Losmandy GM-8/G-11 packages (remember those days?). About this time I met Alan Jordan, designer of this website, through our local astronomy club. Alan was using a Takahashi FS102 apochromatic refractor and one night he had it at our club observing site. Apos use multiple elements made from extra low dispersion glass (ED) and/or fluorite to eliminate chromatic & spherical aberration - the FS102 is a 4" f8 fluorite doublet. Now that was pretty intense in my view and at that time this was the first Takahashi refractor I'd ever seen. I couldn't stand it anymore; I was going to buy an apo refractor. I checked availability and cost everywhere and later called Anacortes Telescope & Wild Bird and spoke with Herb York. Herb indicated he had an Astro-Physics 130mm EDT (a 5.1" f8.35 ED triplet) he would sell that was virtually unused. I was amazed to learn this - A-P scopes were every bit as difficult to obtain then as they are now and said I was interested. At the time I was traveling to Oregon on business once a month and on one trip rented a car and drove to Anacortes, Washington to see Herb. I bought the A-P and ordered a Losmandy GM-8. In those days, much like today, you had to wait for nearly everything, so I ordered the mount, which would be fine for visual applications with the EDT. I never saw the GM-8; a G-11 became available, I paid Herb the up charge and had them ship. The picture at right is the G-11/A-P 130mm EDT set up visually. |
|
|
The Losmandy G-11 mount is probably the best value in an entry level German Equatorial. I believed this when I purchased mine and think it remains true today. I had good results with this in the non goto version. Photo courtesy of Losmandy website |
|
|
2000 After re-equipping and purchasing a more accurate mount I got to thinking, why not add a camera and give imaging a whirl? Little did I know what would happen when I started walking this path... In March I started gearing up to image with film. I purchased a Takahashi FS78 (a 3.1" f8 fluorite doublet), an SBIG ST-4 autoguider, a Nikon F3 body and many, many other accessories to get the system up and imaging. The picture at left indicates my initial imaging platform in late 2000. Alan Jordan was ahead of me on the astrophotography learning curve and served as my mentor in these 'early days'. Alan helped me put into practice what before had been only reading and planning about this pursuit and we spent many hours drift aligning and imaging where he once lived in North Berwick. This wasn't long ago really, but in the imaging world it was the dark ages. It was around this time that goto technology - using computer assistance to point telescopes to objects - was making affordability inroads for the average amateur on an equatorial system. Losmandy introduced the Gemini Goto system and I later retrofitted my G-11 with this. I never did get the G-11 Gemini working as well as I'd hoped and began investigating other options. In this photograph I'm using the vaunted A-P 130mm EDT with my Takahashi FS78 as a guidescope. You can see a Nikon F3 with a lens mounted piggybacked and my first Pentax 6X7 at prime focus on the A-P. |
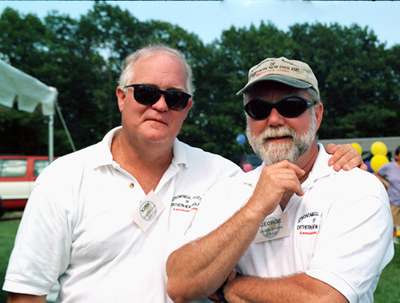
| Also around this time I met the fellow that would become my imaging partner and traveling companion seeking dark sky sites, George Whitney. Here we are at the opening of our club's Starfield Observatory in July 2001 (I'm on the left). George and I first hooked up through our club (ASNNE) as we were both using 10" LX200 Classic telescopes and it was natural we do so. We had a desire to enter into imaging and were shooting film. George's process to develop the excellent imaging platform he uses these days paralleled mine closely. Since this time we've met many wonderful people through this pursuit and have had some great times doing astrophotography sessions in various parts of the country. Locally, Paul Howell and Rob Burgess, both imagers, have become part of our joint effort. Paul is well ahead on the CCD learning curve and I/we look to him as the 'answer man'. I'd like to point out that Paul and Rob both have or had classic LX200's; Paul an 8" and Rob a 10" like ours. George and I now have an extended group of imaging friends that we stay in contact with and we remain updated on what everyone is doing related to this pursuit. |
|
|
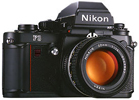
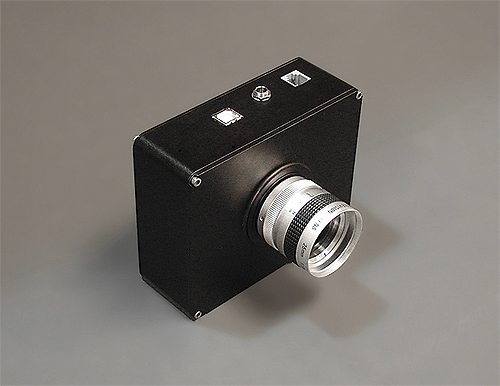
My first camera for imaging was a 35mm Nikon F3hp like the one in this photo. You learn quickly what changes to make in order to use this for night work. I removed the finder and switched to a DW-4, a 6X magnifier and used several screen types. I almost never missed critical focus using this. I have two of these bodies: they work great for astrophotography and the shutter can be locked open without a power source. For 35mm astro-imaging I don't think you'll find a better camera. |
|

|
This is a Pentax 67 body, which is a bit newer model than the 6X7's I use.
The view indicates various finder
devices that can be used with the 67. For night exposures only the top two would be of much use and I have several of each type.
George and I laugh
when we read over and over that none of the stock finders provide sufficient magnification to focus because all we've used
for years is a folding hood
magnifier (second from the top). In fact most accounts indicate it's not possible to focus with such a low power device. Most imagers are
getting away from film these days so this isn't discussed much anymore.
I rarely miss critical focus when imaging through a telescope. On lens shots you simply use the infinity setting most of the time.
However, I don't wish to simplify things too much... Focusing a camera on a star at night is no easy task and is an acquired skill when done optically.
I have four Pentax 6X7 bodies and a 90, 165 & 300mm lens set.
|
|
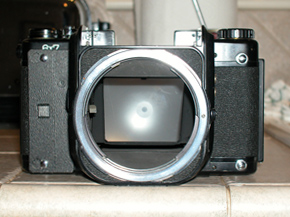
This is a front view of one of my 6X7 bodies. All my 6X7's have mirror lock up and when purchasing you should make
certain of this feature or plan to 'hat-trick' when starting the exposure.
For astrophotography purposes the older, manual bodies that allow the shutter to remain locked open for extended
periods without power are best. The plate on the left in this photo, partially covering the '6X7' text, is a two-part
Hutech battery eliminator, which allows long exposures without power using a cable release. This is a good thing in New England in the winter.
I really enjoy widefield shots and no matter how much I get involved with CCD will shoot film as long as Kodak E200 remains
available.
|
|
This is a photo of an SBIG ST-4 guider. This device revolutionized imaging and spelled the end of manual guiding. It worked well and was accurate when controlling the mount when imaging. It is still in use today although the newer version STV or a secondary chip in a CCD camera is more common now. Photo courtesy of SBIG |
|
|
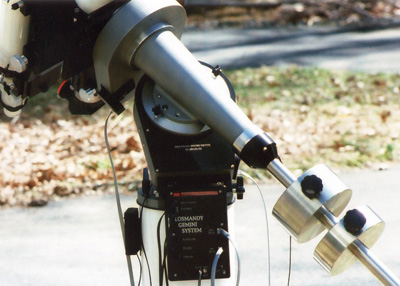
2001 In January of this year I ordered a Mountain Instruments MI-250 mount and MI-8 pier. The MI-250 utilizes the Losmandy Gemini system, which I used at Level 3. In preparation for this purchase, I sold the Gemini retrofit kit and later the G-11 mount. I was apprehensive about buying another mount utilizing the Gemini Goto technology, but Larry Meyers, owner and builder of the MI-250 was patient and convinced me I wouldn't experience the problems that plagued me previously. In the end result, he was absolutely correct. I've used Losmandy dovetail plates for sometime as viewed in these photographs. I like these dovetails and the various components are easily interchangeable when modifications are required. The stainless steel weights and saddle were purchased from Astro Accessories by Robin Casady; these are of excellent quality. I have multiple Casady weights for both A-P mounts and several of his saddles and tandem bars. |
|
This photograph shows the MI-250 Gemini control panel where the mount control hand paddle, autoguider and laptop connect. It utilizes the same servo motors as the Losmandy GM-8/G-11 Gemini versions but the gear and worm sets differ. I never had motor stall issues with the MI-250 and the accuracy of the mount when in goto mode was outstanding. When using it for film imaging I became so convinced of the accuracy of finding the target object that I rarely did anything more than slew to a star near the object, check the position with a Telrad for centering, slewed to the target, calibrated the autoguider and started the exposure. I got where this could be accomplished in about ten minutes or less when seeking a new object. When set up for multiple days it was also fun to use it in daytime to find bright stars and whatever planets happened to be up at the time. |
|

|
The picture at left shows my MI-250 Goto as set up when it first arrived in April of 2001. This mount was an exceptional performer and a terrific astrophotography asset. I would like to thank Larry Meyers of Mountain Instruments for building such an outstanding product. Larry's service after the sale is second to none and I urge you to contact him for more information regarding his mounts should you be in the market for one. I sold this mount for one reason, I was seeking a larger payload and would comment that I do miss many aspects of using it; it was like a good friend. |
|
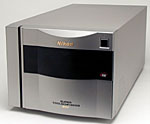
In the 'early days' it was common for imagers to outsource the enhancing phase of their images. I decided it was time to learn how to do this, or at least attempt to, so purchased a film scanner that would accept 6X7 film. The Nikon 8000ED was the result of my research of what was available. It never ends with this pursuit however, because you'll end up upgrading your computer - faster CPU, more RAM, larger hard drives, etc., to be able to work more efficiently. Since this time I've upgraded the scanner to the newer 9000ED version when it became available and my computer system consists of a AMD 64 3800+ chip with twin 300GB hard drives, 4GB of RAM and a 500GB external back up drive. Photo courtesy of Nikon website |
|
|
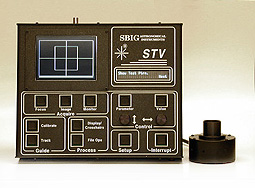
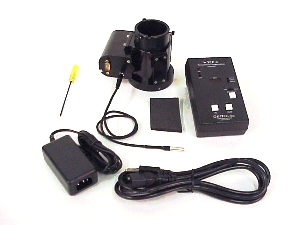
In 2001 I purchased an SBIG STV guider and stand alone camera. George had one of these and one night at a star party he called me over to
check it out. He placed the unit in full auto mode, pressed the calibrate button and I watched as the device selected a star and ran through the
cycle. When this phase indicated it 'passed', he pushed the 'guide' button and that was that... I was absolutely astounded -
"I have GOT to have one of those" was all I said, then went home and made it happen... The STV when used with the eFinder is an accurate device
and most of my images were taken with this system. SBIG later improved the software and it became even easier with newer options. Photo courtesy of SBIG website |
|
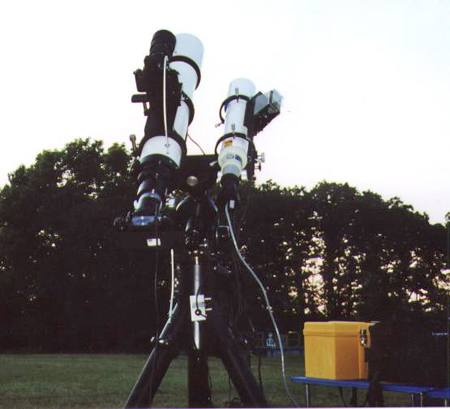
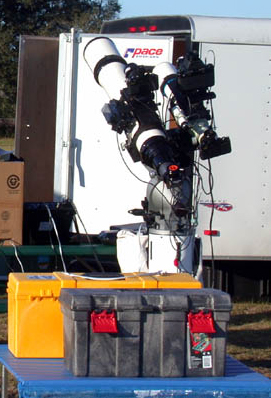
2002 By 2002 I was considering potential upgrades in optics and possibly another mount with a larger equipment payload. I'd been on the Astro-Physics list for a 900 GTO mount and the f6 version of their 130mm telescope, the EDFS, since July of 1999. The EDFS is another apo triplet with lenses constructed from ED glass. I was contacted by A-P to pay a mount production deposit in February and later in May, was contacted for a deposit on the 130mm EDFS. The 900 GTO mount is similar in payload to the MI-250 and I planned on keeping both for evaluation and comparison once it arrived. By now I was fully committed to film imaging and was fairly well equipped for this pursuit. My camera base expanded to include four Pentax 6X7 bodies and two Nikon F3's with a lens set for each. In this photo, I'm shooting with a four camera system. The A-P 130mm EDT accepts a 6X7 body; two more 6X7's with lenses are piggybacked. The Takahashi FS78 only accepts 35mm and I had a Nikon f3 at prime focus on this instrument. I'd been using the STV autoguider with an eFinder since late 2001 achieving excellent results and this freed up a telescope as using one as a guider was no longer required. The photo at right, taken by Jeff Ball, is my system in Chiefland, Florida on an imaging session. What many of the photographs don't accurately depict is the plethora of accessories and planning required to conduct a successful imaging session, especially when traveling. If you figure the expense for each aspect of what you're doing it can add up quickly. In this image two equipment cases can be viewed as well as a trailer used to transport the gear to Florida from Maine. Is a trailer an astro accessory you may ask? Well, yes actually. The quantity of cases for instruments, mounts and accessories can be problematic. In the background you can see several other important accessories, a cardboard box to block light from my laptop (and keep it dew free) and the STV guider next to it. |
|
|
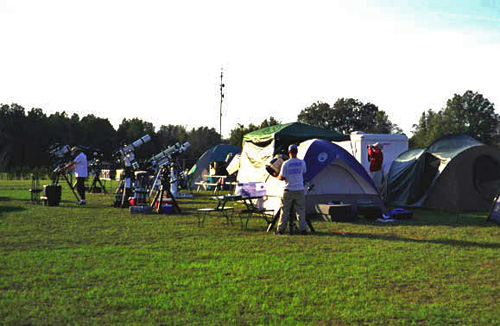
Here's a photograph of our camp in Florida in February 2002; this is fairly typical and generally they look much alike. Later in the trip it was christened 'Camp Sorrow' because we had day after day of overcast weather; not too much rain, but some and the time ticked away with little clear sky for shooting. George claims this only happens when I'm around and over the years I've begun to develop a complex...We had six in our party for this trip from Maine, New Jersey and West Virginia. This was our planned 'winter excursion' and unfortunately, the sky conditions were poor most of the time. Astronomy can be a humbling and frustrating adventure at times. No matter how much you plan or what precautions you take, nobody can do anything about the weather. Having a good group of people around can make for a fun time when you can't image. |
|
|
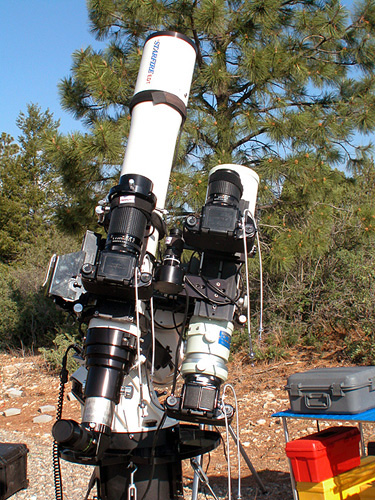
2003 2003 was a banner year in my astrophotography quest...new mounts, new optics - all the planning/dreaming coming to fruition. Everything but clear sky and time to image... This photograph depicts my astrophotography platform at New Mexico Skies in June 2003. My Astro-Physics 130mm EDT is viewed here along with a new Takahashi FSQ-106N a f5 Petzval designed quadruplet astrograph. Ray York of Anacortes Telescope was kind enough to expedite delivery of this telescope in time for the trip west. He even shipped some accessories I required to the facility. In this photo I have three Pentax 6X7 cameras mounted, each uses two cable releases as I employ Hutech Astronomical Products battery eliminators so no power to the cameras is required. Several major upgrades took place in the first half of the year. I sold the MI-250 mount and pier. I was unenthusiastic about doing this, I really appreciated the accuracy and tracking capabilities of this mount, but I had an opportunity to purchase a new A-P 1200 GTO and required funds to execute the purchase. The 900 GTO deposit was still valid and I considered using this towards the 1200 as well. In the end result George and I decided to purchase and equip the 900 and own it jointly - they're just too difficult to obtain. In April of '03 I purchased my first CCD camera, an SBIG ST-2000XM and started learning how to use it. The A-P 130mm EDFS arrived in July and was added to the equipment list. I purchased many accessories gearing up with the equipment changes. In December I ordered a Monolith pier from Particle Wave Technologies. I suspected I was getting some system flexure and was seeking a pier that would prove more rigid. |
|
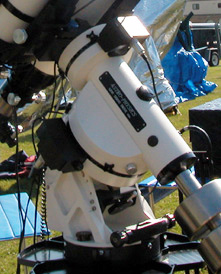
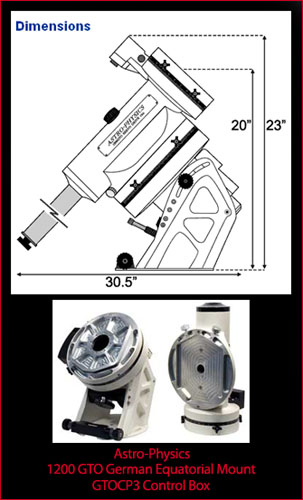
Here is a photograph of my 1200 GTO, a premier imaging mount and a true thing of beauty. The versatility, precision and payload of this mount makes it an outstanding imagaing platform. Please see my A-P 1200 Mount Page for more details. |
|
|
George and several of my imaging friends had gone over to the 'dark side' and commenced using CCD cameras. It was natural that they
would attempt to convince me to do the same when they started getting some great shots. I wasn't opposed to this actually, but CCD cameras
aren't the best investments; like computers they are always being superceded by the next generation, a fact of life I suppose.
I was pleased when SBIG introduced the ST-2000XM because the chip matched closely with a 35mm framing and I decided to save some funds and
purchase one. The ST-2k is considered an entry level camera, a point I used to convince my significant other, Linda, of when I got around to placing
the order...
Photo courtesy of SBIG website |
|
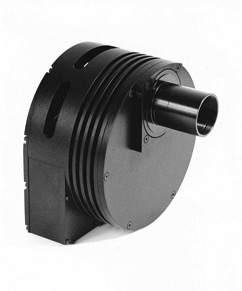
A CCD camera requires precise focus and thusly a powered unit. Because I was setting up to use the ST-2000 with my Astro-Physics
refractors, the Optec TCF was the ideal choice in my view. It worked well and the control was excellent, I just didn't have much time
to use it as the year progressed. If you evaluate powered focusers you'll find that there aren't really that many suitable choices.
In a system like mine at the time, I believe the Optec version was the best of the group.
Photo courtesy of Optec website |
|
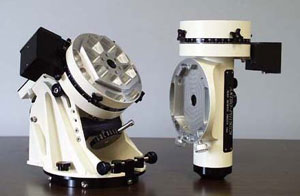
Eventually the 900 GTO mount was shipped and added to the equipment base. This A-P image shows the mount broken down into the two primary components. The larger version 1200 mount is identical to this and they make a nice pair. George and I sometimes set up both our 1200's and the 900 as well at imaging sessions to maximize good sky conditions, but it takes a good deal of time and concentration when imaging so it's not always used. The 900 is portable and fairly quick to set up so it's used at public star parties more than anything. Photo courtesy of Astro-Physics website |
|
|
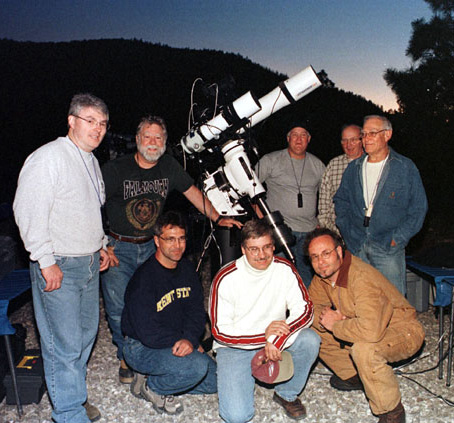
New Mexico Skies - May 23rd through June 6, 2003 We had nine imagers involved in this excursion and overall we had a great time. I believe I could write a book about this trip...This photo is allowed in this section because we're huddled around my mount and represents a portion of the guys we had along: from left to right - Jeff Ball, George Whitney - both standing; Ernie Mastroianni, Joe Schaefer, & Warren Keller - kneeling; Kirk Rogers - standing in the back next to the mount; George Walker and Saul - George and Saul were visiting and didn't stay with us. Don't let George (NMI) Whitney fool you where he's leaning on my mount like he owns it... he may look innocent but his real intent is to push my pier just enough so I could spend the next clear night drift aligning instead of imaging. One thing you learn as an astrophotographer and let the public beware - when an imager has his mount calibrated to critical polar alignment do not touch, approach or walk around it unless you've asked first or it's absolutely necessary to do so. Other than our New Mexico trip, one major drawback I had with imaging was finding the time to do it. My work schedule was extremely active and I was in Colorado often on business administrating a group of projects my firm acquired and rehabilitated in that state for much of the year. I did attend the Summer Star Party in Savoy, Massachusetts and these two trips represented nearly all my imaging for this period. Photo courtesy of Ernie Mastroianni |
|
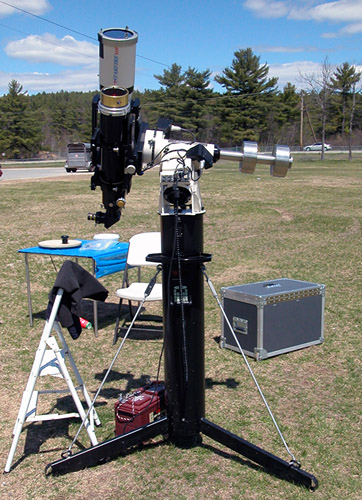
2004 This is what my imaging system looked like going into 2004. Both the Astro-Physics 130mm EDFS and Monolith pier were incorporated as viewed in this photograph from the Winter Star Party in February. WSP is held at a girl scout camp in West Summerland Key, Florida each year and George and I have attended several times. We were joined by our good friend Steve Walters for this week. In this image I'm set up for film work and the ST-2000XM isn't mounted. My 1200 mount and telescopes are in the center; George's 1200 has his 155mm A-P refractor mounted on a short pier and the third, taller assembly is our 900 mount with George's Celestron C-11 mounted. We are generally the center of attention when we set up at a star party and we always have many visitors. Steve was camping with us and his Takahashi BRC-250 was just outside the field of view in this photo; it was covered so purposely left out. I ordered an SBIG STL-11000M CCD camera from Anacortes Telescope in August to take advantage of the large chip technology that was sweeping the CCD world. The camera arrived in November and I sold my ST-2000XM to our friend Rob Burgess in preparation. I later also sold my trusted STV guider and purchased the remote head for the STL, an optional guiding device. Nowadays, I figure I'll always be using the STL when imaging and can guide with this whether shooting with the STL or film. |
|

|
Here are several shots of the STL-11000M CCD camera... To the left is the SBIG web photo. The chip in this device is about the size of a 35mm frame and this technology is changing the way things are done in the imaging world. My time with this camera so far leads me to believe they got it right. A view of the added air purge valve on my STL can be seen below. 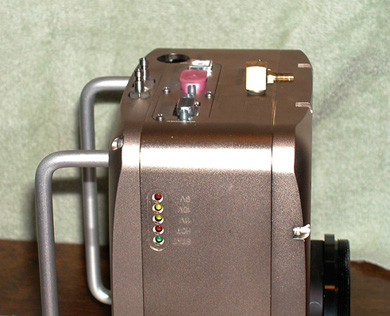
|
|
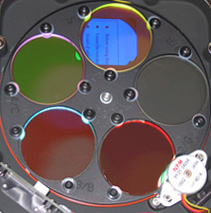
The STL internal filter wheel can hold five 2" filters. In the image at left from Astrodon's website, the assembly can be viewed. I have a luminance, red, green, blue and Hydrogen-alpha filter set. A photo of SBIG's remote guiding head can be viewed below. 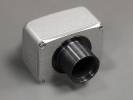
|
|
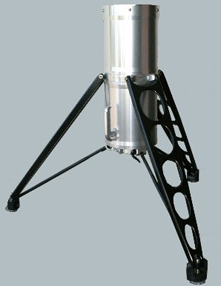
This is a photograph of my Monolith with black legs and clear finished tube. This has proven to be an asset for portable set up and is stable and finely constructed. A pier like this is expensive but I can't say I regret spending the money after having used it for several years. The 42" height is ideal for my refractors and works out well in use. |
|
|
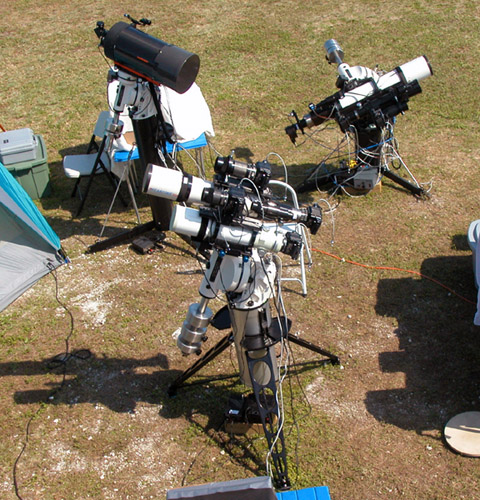
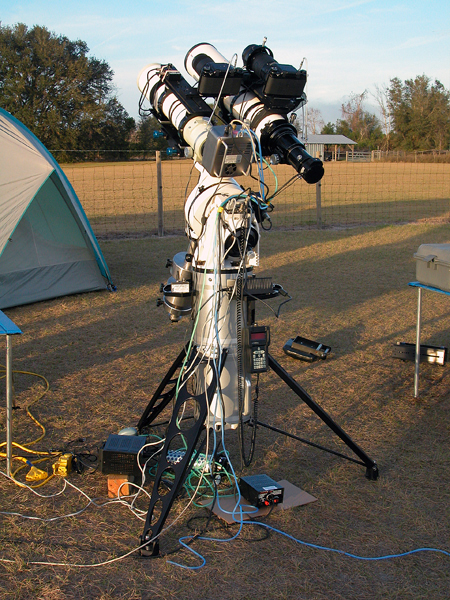
2005 This is a photo of the imaging system I used at Chiefland Astronomy Village on our latest excursion in January 2005. I used the faster refractors during this session due to the better sky conditions Florida experiences - at least better than Maine when it's clear. You can see the STL-11000M camera mounted on the FSQ and two 6X7's piggybacked. In this set up the EDFS is being used as a guidescope and has the STV head installed. The green and blue tubing is for the desiccated air purge and water cooling to prevent frosting and to reduce the chip temperature. This trip represented the first STL images I acquired. These images, shot with a Hydrogen-alpha filter, can be viewed in the CCD section of my website. My current telescope base consists of an Astro-Physics 130mm EDT, 130mm EDFS, Takahashi FSQ-106N, and Takahashi FS78 - all refractors and the new flagship of the group, a Takahashi FRC-300. I've phased out the 35mm Nikon F3 cameras except for tripod mounted shots, but still have all the bodies and lenses. Under the legs of the Monolith can be viewed the desiccated air cylinder and several power inverters to adapt AC power to 12 volt. These power the mount and dew controllers. The roll-a-tables keep equipment off the ground and serve as a work station for the laptop box and other accessories related to imaging. You can see from this photo that things haven't really become less complicated... |
|
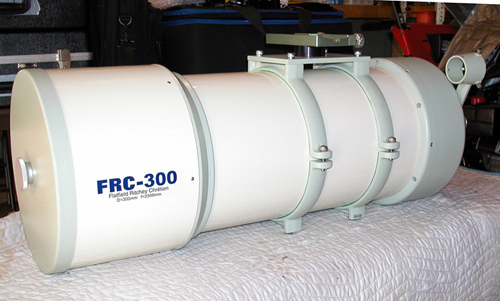
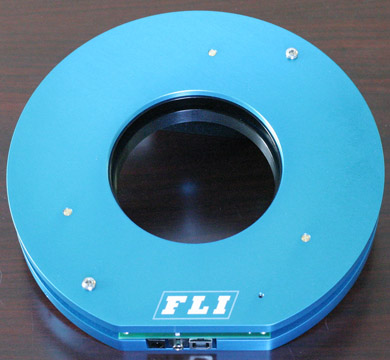
A new camera deserves a new telescope don't you think? I ordered the Takahashi FRC-300 and waited over six months before it was delivered. This isn't a complaint, six months really isn't that long in astronomical equipment terms. This shot was taken the day it arrived, October 16, 2004. So why is it in the 2005 section? Because it wasn't until 2005 that I had all the required components to mount and use it. After waiting six months it was stored for almost as long. However, it's up and waiting for clear skies as of May '05 at Starburst Meadows Observatory, a facility owned and operated by Little Robbie Burgess in Brunswick, Maine. A Finger Lakes Precision Digital Focuser (PDF) was purchased for the FRC, a new focuser designed for larger CCD chips and focusers like my system. Because of the changes, as always more accessories were required, a new counterweight shaft for the 1200, more Casady weights, adapters, etc., but everything is now ready. I hope this year turns out to be a good one for imaging because I've got a galaxy killer in my hands now...Please see my FRC-300 Page for more details of this instrument. |
|
This is a 'Space Day - 05' photograph of our 900 GTO set up for solar observing at a school. George's A-P Traveler has a Coronado H-a filter system installed which provides splendid views of solar activity. My 130mm EDFS has a Baader filter which is good to provide sunspot views to the various classes that came out to observe. We try to aid in public, student and other group outreach as much as we can, but with my work schedule this isn't as often as it used to be. For an event like this one, a day out of the office is required. We also have groups visit the Starburst Meadows Observatory on occasion as this is quite a distance from our club's facility and many groups have no funding to travel these days. George and I remained at this school all day long conducting the solar session and into the night for an evening star party; we were joined by some other members of our club for the nighttime event. |
|
|
Here are several views of the Precision Digital Focuser (PDF), a new focuser designed with a larger aperture. To the left is the Finger Lakes website version; below is the rear view of my PDF with the FRC-300 reducer threaded in. In my photograph you can see the thumbscrews projecting on the mounting anchors. This is a modification that I had machined by PreciseParts so the PDF could be mounted and uninstalled without using a tool. 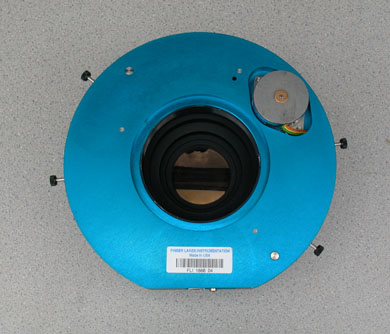
|
|
I added an SBIG ST-402ME camera to my equipment base in September to serve as an autoguider.
The CCD in the 402 is considerably larger than the STL Remote Guiding Head or STV for that matter and is cooled. Plus I wanted the ability to guide both A-P mounts if they were ever set
up as imaging platforms at the same time. My testing with the 402 indicates this is a good camera to guide with and finding a guide star isn't an issue as there are always stars in
the field of view to choose from. Photo courtesy of SBIG website
|
|
In late 2006 I was able to trade up to the newer Astro-Physics CP3 electronics on my 1200 GTO mount. This incorporates various changes and allows for some updated software to be used effectively with the mount. |
|
In early 2007 I contacted SBIG and ultimately shipped both cameras back to be checked and upgraded. This process was fairly quick and the cameras were returned promptly. Due to extreme cold and poor weather conditions in our area, I havent tested the STL since then but did use the ST-402 for guiding as we helped a local high school group obtain some data for a project they were working on. In these few sessions the ST-402 has been a superb guide camera and the ease of use with MaximDL was just the way it is supposed to be. Going into the spring of 07 finds my equipment reviewed, checked and ready for use. Hopefully 2007 will allow time and sky conditions for me to collect an entirely new set of images to step up in the world of CCD.

or go
Home